Smart home technology is becoming more popular every year, but many gadgets are expensive. A smart mirror is one of the most impressive DIY projects because it combines style, technology, and daily usefulness. The good news is that you do not need premium hardware to build one. With a few affordable components, you can create a budget-friendly smart mirror that displays time, weather, news, reminders, and more.
This guide explains how to build a smart mirror using cheap components without sacrificing functionality.
What Is a Smart Mirror?
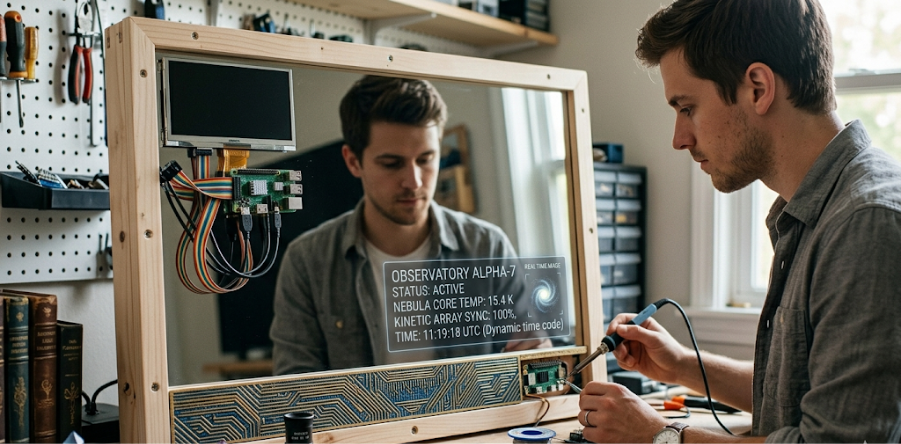
A smart mirror is a regular mirror with a hidden display behind it. When powered on, it can show useful information while still functioning as a mirror.
Common Features:
- Digital clock
- Weather updates
- Calendar reminders
- News headlines
- To-do lists
- Voice assistant integration
- Smart home controls
It is perfect for bedrooms, bathrooms, offices, or entryways.
Cheap Components You Need
You do not need expensive branded hardware. Many low-cost alternatives work well.
1. Two-Way Acrylic Mirror
This is the most important part. A two-way mirror lets the display shine through while reflecting like a mirror.
Budget Tip:
Use acrylic instead of glass because it is cheaper, lighter, and safer.
Estimated Cost: $20–$40
2. Old Monitor or Used LCD Screen
Instead of buying a new display, reuse an old computer monitor or TV.
Best Sizes:
- 19-inch for desk mirror
- 24-inch for wall mirror
- 32-inch for large smart mirror
Estimated Cost: Free to $50 (used)
3. Raspberry Pi or Cheap Mini PC
You need a device to run the software.
Affordable Options:
- Raspberry Pi 3 or 4
- Used mini PC
- Orange Pi boards
- Old laptop motherboard
Estimated Cost: $35–$80
4. Wooden Frame
Use plywood, MDF board, or recycled wood to create the mirror frame.
Budget Tip:
Use old furniture wood for free.
Estimated Cost: $10–$25
5. LED Strip (Optional)
LED lighting behind the frame improves appearance.
Estimated Cost: $5–$15
Software for Smart Mirror
The most popular software is MagicMirror², a free open-source platform.
Why Use It:
- Easy setup
- Large plugin community
- Weather modules
- News feeds
- Calendar sync
- Motion sensor support
Install it on Raspberry Pi for best results.
Step-by-Step Build Process
Step 1: Prepare the Frame
Build a frame slightly larger than the monitor. Leave space for cables and ventilation.
Step 2: Mount the Display
Attach the old monitor securely behind the mirror panel.
Step 3: Install the Two-Way Mirror
Fix the acrylic mirror to the front of the frame.
Step 4: Install Raspberry Pi
Connect Raspberry Pi to the monitor using HDMI.
Step 5: Install Software
Install Raspberry Pi OS and MagicMirror².
Step 6: Configure Widgets
Add modules like:
- Clock
- Weather
- Calendar
- Motivational quotes
- News headlines
- Traffic updates
Step 7: Wall Mount or Stand Setup
Mount it in your room or place it on a table.
Money-Saving Tricks
Reuse Old Electronics
Old monitors and laptops are excellent sources of free parts.
Buy Local Used Hardware
Check local marketplaces for cheap screens and boards.
Use Free Software
MagicMirror² is free, saving software costs.
DIY Frame
Making your own frame is far cheaper than buying one.
Example Budget Build
| Component | Price |
| Used Monitor | $30 |
| Raspberry Pi | $45 |
| Acrylic Mirror | $25 |
| Wood Frame | $15 |
| Screws/Cables | $10 |
Total Cost: Around $125
Many people build one for even less using recycled parts.
Advanced Upgrades Later
Once your smart mirror works, you can upgrade gradually:
- Touchscreen overlay
- Voice assistant
- Face recognition login
- Home automation dashboard
- Fitness tracker display
- Security camera feed
Common Problems and Fixes
Screen Too Bright
Lower brightness settings for better reflection.
Mirror Too Dark
Use better two-way acrylic sheet.
Slow Performance
Use lightweight modules or upgrade Pi model.
Heat Build-Up
Add ventilation holes or small fans.
Why Build a Smart Mirror?
Benefits:
- Stylish home gadget
- Useful daily information
- Low-cost DIY project
- Great learning experience
- Customizable design
It is one of the best beginner electronics projects.
Final Thoughts
Building a smart mirror with cheap components is easier and more affordable than many people think. By reusing old hardware and choosing budget-friendly materials, you can create a modern smart home device at low cost.
Whether you want a clock mirror for your bedroom or a full home assistant dashboard, a DIY smart mirror is a fun and practical project worth trying.